Back to Equipment Page
With a drysuit use steel cylinders, with a wetsuit use aluminium. A drysuit is your redundant buoyancy source so you can afford the added weight of steel, with a wetsuit then you cannot.
Always use low pressure cylinders. High pressure (300bar) puts added stress on components (even those rated to 300bar) and makes gas mixing difficult. Bear in mind that not all places which advertise 300bar gas fills will give a fill to 300bar, usually closer to 270bar once they have settled.
Band them together with good stainless steel bands and get some good bolts to attach them to the backplate. Always use standard nuts, not wing nuts. Wings break and they will also wear through suits. A 14mm socket on a ratchet will work on a metric M8 nut.
The cylinders must be joined with a manifold with an isolator. Check the Q & A section for why manifolds are the best choice. Make sure it is DIN. The knobs should be replaced with rubber knobs. Impacts can shatter plastic and warp metal knobs, but rubber will absorb blows. Even though the cylinders should be low pressure, a 300bar manifold should be fitted if possible. The 300bar female DIN allows the full length of the male DIN regulator fitting to connect but the 200bar fitting is much shallower.
Never use boots, they just trap grit and salt, and they hide corrosion. A boot is only there to let the cylinders stand upright -- if they stand up then they can only fall down.
Back to Equipment Page
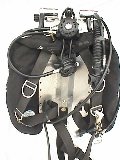
The backplate should be metal. Never use the ABS plastic kind, they will crack. Choose steel if you need more weight or aluminium if you are too heavy.
The harness should be one single piece of continuous webbing with no breaks and no quick releases. Quick releases will break if you load the harness and they can pop easily when you move if a fold of your suit catches it. A single piece has no failure points. It should be threaded into the backplate so that it does not cross behind the neck (better range of movement) and should be loose enough to get in and out of easily, but tight enough to sit securely on the shoulders.
There should be a d-ring on each shoulder strap and one only on the left waist strap. There are none on the right side.
The crotch strap holds everything balanced and secure while swimming, it too is a continuous piece of webbing. The front loop should have a d-ring attached, and there should be another at the rear, just below where it joins the backplate.
Good performers should be used and the face plate needs to be easily removed so that debris can be cleared from it underwater. High performance regulators are not the best as they tend to freeflow easily, but all regulators should have the interstage pressure tuned down to the bare minimum.
The first stage should be designed so that all the hoses can point downwards for streamlining.
- Right Regulator
- Left Regulator
This is the one which you breathe from and it is also the one which is handed to (or grabbed by) your partner in an emergency. The second stage must be on a long hose, 2m long is the ideal size. Once all the other hoses are in place this one is wrapped on top: it runs from the first stage down behind the wing, under the battery back, between it and the diver, up diagonally across the chest, over the left shoulder and round the neck, curling round to the divers mouth from the right.
A large o-ring is looped through a bolt snap and looped around the second stage end of the long hose so it can be clipped out of the way when not in use. The o-ring means it can be pulled free easily.
A LP hose runs from the first stage across to the left behind the neck and connects to the wing inflator. The corrugated hose should be adjusted so that it is the right length. Both hoses run through a loop of bungee on the left shoulder d-ring. With it behind the neck it is easier to hear leaks.
These are your back-up systems. The back-up regulator is on a loop of bungee and hung around the neck until needed. This will be upside down when swimming so it could freeflow, either detune it or buy a low performance second stage to stop it. This can save 30bar of gas. The hose should be shortened so that it is not sticking out.
The pressure gauge is connected to the left. This is just a gauge with no boot or console or any distractions. Attach a bolt snap the same way as for the long hose. In use , clip it to the left waist d-ring, just unclip it to read, then put it back. The bend in the hose is very wide, less stressful than a tight bend so less likely to fail.
Unless argon is used, the drysuit hose attaches here too. It also crosses behind the neck and feeds under the arm.
The primary light should be an umbilical type with a battery pack and remote light head. These provide superior burn times and are hands free. The battery is worn on the right waist strap, looped on and held in place with a belt buckle. The battery forms part of your weight system and can be dumped in an emergency. Keep a spare bulb inside the battery case, it is also a safe place for money and car keys!
The light head should be the test-tube type, not the dichroic spotlight kind. Test tube lights have a purer, white light and the beam can be focussed easily depending on water conditions. The light-head must have a Goodman mounting so it can be worn on the back of the left hand, so the hands are always free. The left hand holds the light because the right is used when driving scooters, it is also the one with the gauge attached.
For those with cash to spare, HID (high intensity discharge) lamps can be used. These are very efficient and can extend the battery burn time considerably. The light is at the UV end of the spectrum, so it produces little heat (IR) radiation, is very white and can be used above water too. Never look straight into an HID light as the UV emissions could cause eye damage.
Store the lighthead with the test tube removed as condensation can form and corrode the connections.
These need to be even more reliable than your primary light. If your primary fails then this is what your life depends on.
They should be cylindrical, long and thin with a bolt snap on the end. You carry two, one clipped off on to each shoulder strap d-ring. There should be a piece of bungee or inner tubing on the strap that you can tuck the light in to so it sits tight and streamlined against the harness. A quick pull releases them straight into your hand, and they are very easy to replace.
The design is important. There must be no mechanical switches, they should be turned on by twisting the head. Switches can leak, and even though they may work on the surface, they may not work under pressure. The depth rating just means they will keep water out to that depth, it does not mean the light will actually function.
Switches are also hard to find with thick gloves when your hands are cold. Twist-ons are easy to work.
The best use three batteries to run a bulb which would normally take four. This means that there is less chance of the bulb blowing when it is turned on.
A cutting tool is essential. If a knife is used then it must be small and sharp. Shears are better, they cut quicker and will cut through thicker material with less effort than a knife, and most work one-handed.
Whichever you choose, wear it in a sheath on the left waist strap.
A compass is essential for navigation and should be worn where it can be used without interfering with anything else. Computer batteries can affect the needle. Console compasses should never be used, only either wrist mounted or hand-held (kept in a pocket when not in use).
The pressure gauge is attached to the left hand regulator. It should have a bolt snap attached by an o-ring. The gauge is clipped out of the way to the left d-ring on the waist. It is unclipped and read whenever needed. It does not interfere with stage bottles when used like this and is safe from entanglement , even when scootering. The gauge should not be housed in a console or have any boot..
Computers should never be used for planning decompression. The dive plan should be planned using tested decompression tables, but a computer may be used in "gauge" mode i.e. for tracking depth and time. Otherwise use a bottom timer. There is a lot of argument over whether a back-ip should be carried. Some say your partner is your back-up, some say take a watch, others say take a gauge. The decision is yours.
Computers are only used when doing recreational, no-deco limit diving.
Keep fins as simple as possible. There are a lot of fancy designs,weird vents, inserts, vanes and splits. Most are extremely expensive, and they just do not work. Save your money. The best are the most basic.
Scubapro's Jet fins are very popular. Not only are they a very basic design but they are quite powerful too. The weight of them also means that the feet stay in perfect position and ankle weights are never required.
It is possible to replace the fin strap with a stainless steel spring which will never break. I drilled a hole in each side of the fin pocket and added a loop of 4mm bungee. If you use standard straps then make sure the loose ends are taped down.
Stage bottles should always be aluminium. Their buoyancy characteristics are far superior, they start off very slightly negative and end up very slightly positive, but they are always very close to neutral at any point.
There should be no metal to metal connections at any place in your equipment, and this includes the stage bottles. The clips are attached to the stage bottle by some 6mm/0.25" nylon cord. Form a loop of cord with a clip attached at the top and tied in place and another clip tied in place at the bottom. The bottom end is held in place by a hose clamp around the cylinder, about one third of the way up. The top clip needs to be tight to the stage body, but the bottom clip should be on a fairly loose tail to make attaching it to the waist d-ring easier.
Put your best regulators on the stage bottles - you will be using them when you are tired, at the end of the dive, so you want the easiest breathe. They should be on a 1m hose so that it can be run from the left, behind the neck and round from the right when in use. This keeps the hose streamlined as you swim.
Attach a small gauge and bend it back on itself and tuck into a loop of bungee around the valve neck. If you use a short hose then it stays out of the way but I prefer a standard length hose because the bend is not as tight and less likely to burst or tear.
Tuck all the hoses into loops of inner tubing or bungee. With bungee, tie the loops with a fisherman's (or grapevine) knot, leaving loose tails so that you have something to pull when replacing the hoses. With inner tubing, leave a tab on the loop to pull.
Back to Equipment Page
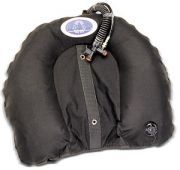
Only ever use a good quality wing. Never use a wing with an elasticated cover or bungee retaining cords - see the Q & A section. Also only use one wing.
The bladder will be tough, but reinforce it with a U-shaped piece of inner tubing wrapped around it, under the cover.
Make sure the corrugated inflation hose is not too long. Shorten it to the right length. There should be no pull dump on it as it can dump air by accident as the hose moves. Either disconnect the pull cable and glue up the valve, or replace it with an elbow without the dump valve.
Use a membrane drysuit. Neoprene, even compressed/crushed neoprene, will compress at depth and lose its buoyancy and thermal properties. They are also restrictive.
Go for a front entry suit. The back zip reduces your range of movement. It also means that if you and your partner become separated then you may not have anyway to get the suit off on the surface.