The parts
used are as follows:
-
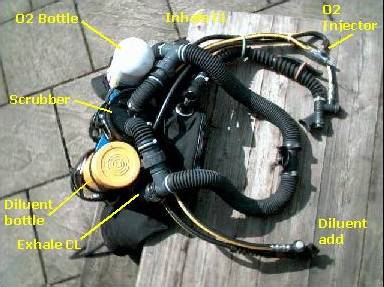
Scrubber, DSV
& Corrugated Hoses:
these are Draeger Ray standard parts, costing
around £200
-
Counterlungs:
like
the KISS, these are flexible waterbags. The connections for the breathing
loop are Draeger P-ports and the hoses for gas addition are attached with
Lapp watertight glands. The covers for the counterlungs are made from nylon.
-
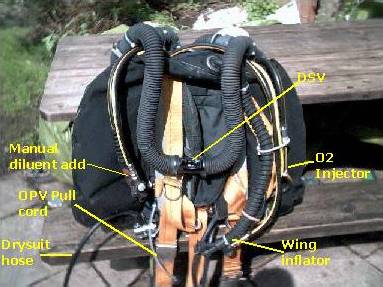
Manual Addition
Valves for O2 & Diluent: these are standard BCD inflator valves
modified to have 12mm rubber air hose instead of corrugated hoses. The
button on the O2 addition has a guard to prevent accidental addition. The
hoses are custom length, made up using AP Valves fittings.
-
Oxygen Injection:
this
is done with a Swagelok metering valve which can be adjusted and locked
in place to get the right setting. This allows the system to be used with
depth compensated regulators rather than fixed IP valves
-
Regulators:
Apeks
TX40 for the O2 and Poseidon on the diluent
-
Oxygen Meters:
I
have used a different type of meter from the original DPM128s. I
now use DATEL LCD-20 meters as used in the Mark Munro design
-
Custom Length
Hoses: I made almost all the hoses using 1/4" air hose from Thorite
and either push-in barbed fittings or AP Valves reusable fittings.
-
Sensors: The
sensors are Teledyne R17D, as used on the Cis Lunar. The real reason I
used them is that is what comes with the El Cheapo kit.
-
Handset: The
handsets being used are custom
made lexan housings with electronics which I built myself. The system
consists of two independant oxygen displays.
|
Things
to do for the future:
-
Rationalise
the hose layout: I've tried to make all the hose runs as clean and
as neat as possible but I think it still needs some rationalisation. I
don't really need to access the O2 injection valve during the dive so this
could be relocated. I am happy with the diluent location.
-
Oxygen Addition:
the
metering valve appears to work well and it has the advantage that it can
be preset to any flow rate at the start of the dive, during the preparation.
This means that a normal, variable IP 1st stage can be used. I would like
to replace the system with a KISS valve but I would be trading that flexibility
for simplicity.
-
Cylinders: the
unit uses 3l bottles at the moment but I am considering replacing them
with 5's or even 7's. This would give a much better bail-out option for
deep dives, there would be more than enough diluent for bail-out and plenty
of O2 for OC deco. The cylinders are currently inverted but I think I might
prefer bigger bottles mounted the right way up.
-
Secondary Systems:
I
am not happy with things like suit inflation, wing inflation and bail-out
reg being run off the same 1st stage as my diluent. If it fails then I
lose everything. Combined with a move to bigger bottles, the addition of
a H-valve should improve safety.
-
Backplate &
Wing: the unit needs a steel backplate for more negative buoyancy.
Currently it uses aluminium which is too light. I may even be able to get
away with a smaller wing.
-
Cylinder Attachment:
Protex
do a range of stainless steel quick release straps for the offshore industry.
I will be replacing the current method of attachment with these.
Scrubber:
the
standard Draeger scrubber is small, only holding 1.25kg of sofnolime which
is rated for 70min use. As the Ray is only designed to be used at 21m then
it would be fair to assume that the scrubber life would be shorter in deeper
water. I am considering two options, one to have a Delrin cannister machined
by the same people doing the display handset, or two, to simply splice
a length of polycarbonate or Delrin tube between the ends of a Draeger
cannister and extend the dip tube. I suppose option three is to invest
in a Dolphin scrubber but the shape of these do not lend themselves to
my RB's layout
|